
Pre-Feeding Oral Motor Exercises with SLP Angeliki Xygka
18th Apr 2022

Are you interested in learning more about feeding therapy skills? You've come to the right place! Below is the video and transcript from a live webinar we hosted featuring Speech Language Pathologist (SLP) Angeliki Xygka.
Angeliki discusses four targets that are the foundation of successful feeding, preparing the mouth to eat and swallow later on. Read and/or watch below to learn sensory tips and oral motor exercises that you can try today.
We hope you find it helpful! If you have any questions at all, please let us know. And feel free to sign up for our newsletter to know about future webinars.
.
.
Hannah: So I wanted to quickly introduce Angeliki before we get started! We’ve been really fortunate to work with her over the years, and she’s created some awesome demo videos with our products. Angeliki is a Speech and Language therapist, Myofunctional Therapist, and Sensory Integration Therapist all the way from Athens, Greece. She graduated from City University London in 1996 and was trained by the Academy of Orofacial Myofunctional Therapy. She’s developed her own method of tongue thrust therapy and really enjoys teaching that in her own seminars, so we’re really excited to have her here today and I'll let you get started!
Angeliki Xygka: Hello everyone, hello Hannah! I am Angeliki. Here in my clinic in Athens, I work mostly with children and I specialize in Apraxia, speech and language delay, and feeding therapy. I am also a Myofunctional Therapist and have developed my own method for tongue thrust, so I believe I’m quite the tongue expert! I am also married and a mother of five children, so I had lots of mouths to feed and practice before carrying over to my clinic.
Today, I’m very happy to be here to present this webinar on feeding therapy and my favorite Z-Vibe tools that I use during my sessions.
When we start a feeding therapy program, our final aim is to get the child to swallow and chew safely. My personal program is a combination of both sensory integration and myofunctional therapy. In clinical cases, you will see children with oral sensitivity, so here comes sensory integration. And you will see children with weak oral motor skills, so here comes the myofunctional therapy. In most cases, you will see both of those two problems.
Our final aim in feeding therapy is chewing, but in order to get there, we have to first establish four basic targets: Oral desensitization (if we have sensory problems), lip closure and jaw stability, tongue lateralization, and tongue elevation. So for those four targets, I’m going to present the exact Z-Vibe tips that I’m using from ARK Therapeutic.
.

.
ORAL DESENSITIZATION [2:40]:
We all know what the Z-Vibe is from the excellent presentation with Katie Zelinski from a few weeks ago, so let's dive right in and talk about oral desensitization.
In many cases, you can see that the child doesn’t even want to touch their face, it can be very irritating for them, so I’m not going to start immediately with the Z-Vibe.
So, before using the Z-Vibe, I’m going to start with some gentle massage and techniques without any tools to get the child used to the massage on the face. Then, I’m going to take my Z-Vibe with the Preefer Tip (I like to start with the Preefer):
- I don’t immediately start with vibration. First I do some massage on the cheeks without vibration. If I see that this is okay, then I turn on the vibration.
- I always try every new tool I use on the hand to give the child an idea of what’s coming to the face—I explain that it’s not going to hurt, it’s just tickling and it’s funny!
- With the vibration turned on, I start doing this nice massage on the cheeks, rolling the Preefer Tip in a circular motion on both cheeks, the lower lip, and the upper lip. I usually count up to three.
- Then I stroke the cheeks from the corners of the lips up towards the ears on both sides. And then in the opposite direction back downwards towards the lips.
- And, I’ll tell you my little secret! I always massage behind the ears and the neck. Many children with oral sensitivity are scared to go get a haircut because they are afraid of the electric clippers and the “zzzz” sound near their ears. So I always practice with massage and vibration especially near this area. And after a month, trust me, they're coming in with a very nice haircut! So, I like the Preefer!
- I also like the Soft Brush Tip a lot, because I think it’s more stimulating. Again, first I try on the hand and then I do a gentle massage on the cheeks in circular movements and around the lips and always the ears.
There are many other Z-Vibe tips you can use for massage of the face.
On a side note, it's nice to have two Z-Vibes, because it saves time in having to change the tips, and with some children you have to be very quick to change and move from one activity to another.
.
.
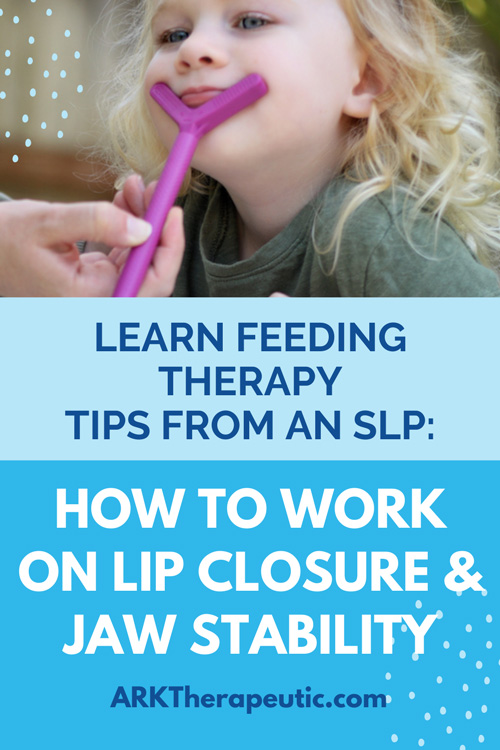
LIP CLOSURE AND JAW STABILITY [5:35]:
At this moment, when we do this desensitization, it’s very convenient to work on lip closure and jaw stability at the same time, because I use some of the same tips for both goals.
For example, I’m going to use the Preefer Tip again:
- I start to gently massage around the lips like we did before for oral desensitization.
- And what I want to do for lip closure is this movement [rolling the Preefer from the chin up to the bottom lip], with the vibration of course, upwards on the lower lip for a count of three - 1, 2, 3, and then hold for three seconds.
- Then repeat on the upper lip [rolling the Preefer down the philtrum to the top of the upper lip] for a count of three - 1, 2, 3, and then hold for three seconds.
- And don’t forget the sides of the lips. Push in the center [push corner of lip towards the center of mouth, count to three] and then repeat on the other side.
How many times you repeat is going to depend on how cooperative it is to work with the child, and the tolerance of the child. I specifically work on the lower lip because I think it’s looser—you usually see a young child like this [mouth open with tongue resting forward on the lower lip]. It gets really heavy. So, I’m trying to elevate the lower lip as much as I can.
So the Preefer is very nice to begin with. I also like the Y-Tips very much. Usually, I start with the medium (magenta) one. You can also use the smaller (orange) one if the child is very, very young.
- Again, I introduce it to the hand first.
- I use it for some massage on the cheeks.
- And then I go under the chin [using the Y Tip to support underneath the chin]—it’s good for jaw stability. I use it a lot in other exercises too if I want to work on jaw stability.
- And then I go to the lower lip [using the Y Tip to push the lower lip up]—look how nicely it holds the lips together. It’s very nice, the Y-Tip! So, press upwards for a count of 3, and then hold for three seconds.
- Then repeat on the upper lip and the sides of the mouth.
Then, I’m going to use the Button Tips. I love the Button tools! I’m going to use them a lot later on. I think it’s a very good Z-Vibe tip for lip closure. I’m going to use the big one, but if it’s too big for your child, you can go a size smaller—there are four sizes in the collection.
- First, I’m going to use it on the hand.
- Then it’s very good for some massage [touching the button around the lips and on the cheeks].
- Then, I’m going to ask the child to give a kiss to the button.
- Then, very slowly, you have to explain that you want the child to hold the button with their lips. Be careful here with your directions, because they may try to bite it, and we don’t want that. So first, ask the child to close the teeth, then [wrap their lips around the Button Tip] and hold it with the lips.
- You can do some “pull ups” [having the child hold the button in their lips, and pulling it out and repeating].
- You can ask the child to hold it tightly [and gently pull].
- Don’t forget to work on the sides of the mouth [move the button to the sides of mouth and pull it out]. You can see some drooling sometimes, from one side [of the mouth] or the other. So especially if there is asymmetry on the face—you have to work more on one side. Make sure to work the sides in the same way [repeat exercise three times then hold for three seconds].
- Then, take the Button Tip off of the Z-Vibe (because it’s very heavy to do this next exercise with it attached to the Z-Vibe). Ask the child to just hold it [in their lips] up to ten. Close the teeth, wrap lips around the Button Tip, count to ten, and pull!
- We can also ask the child to listen to some very strong pops [of the lips when pulling out the Button Tip]. It’s funny, that one! And kids like to hear the pop, pop!
- A more difficult exercise is to ask the child to move the Button Tip from one side of the mouth to the other. Then, you can also move to the smaller one, and even the very, very small one, it’s more difficult. I usually like to work with the big one, and one size smaller.
.
.
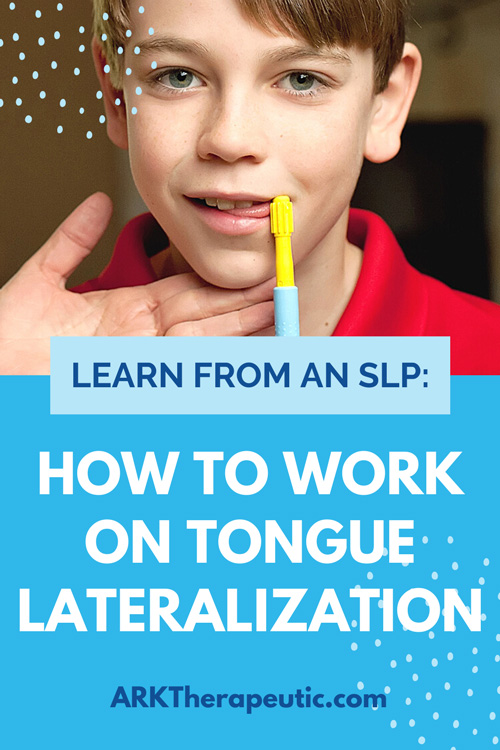
TONGUE LATERALIZATION [11:06]:
Let’s go now to tongue lateralization. Why do we need tongue lateralization? Because we need the child, when learning to chew and swallow, to take the food from one side of the cheek to the other side, and learn to eat on the molars and not on the front teeth. A child with a premature pattern of chewing and swallowing and tongue thrust knows only this [front] area of the mouth and the front teeth. They have no awareness of what’s going on in the oral cavity.
I’m going to start with the Preefer Tip. Remember now that it’s the first time we’re going inside the oral cavity. So, if there is some sensitivity, we have worked outside with massage on the face and massage on the lips, and lip closure. But now, we’re getting inside. So be prepared if it’s not so easy in the beginning:
- I’m going to start without vibration and gently massage the cheeks inside the oral cavity [rolling the Preefer inside the cheeks]. Count to three always, and on the other side.
- If I see that it’s okay, from the child, then I’m going to add the vibration [and repeat the same rolling exercise].
- Then I'm going to take the tongue and push it to one side, and then the other side. Three pushes and then I’m trying to hold the tongue on the one side. Up to three [seconds] is okay, I don’t want the child to feel any pain. Repeat on the other side also.
Then, I’m going to add the Bite-n-Chew Tip XL (Textured). I like it because it's bumpy and very soft:
- I’m doing the first introduction on the hand.
- Then a nice massage on the [inside] of the cheeks.
- And then the same movements [using the tip to push tongue to one side three times, then holding for three seconds and repeating on the other side] on the tongue. It’s very nice and very stimulating; it’s soft and the feeling is very nice on the tongue.
- At this point, I’m going to introduce the very beginning of chewing. I turn off the vibration, [chewing] is not very nice with the vibration, and I ask the child to bite on the one side and then on the other—with the molars, and not with the front teeth. Count to three [bites] then hold it.
Then I’m going to use the Tongue Depressor Tip—I call it the "spatula". For tongue lateralization, I like to use the textured one because I think it’s more stimulating:
- So again, I introduce it on the hand first.
- Then I massage [the cheeks] and then I work basically on the tongue [doing the same tongue pushing exercise done previously with the Preefer and Bite-n-Chew Tips]. Because it’s textured, it gives very nice stimulation on the tongue, and you can hold it easier.
So, for tongue lateralization—I use the Preefer, the Bite-n-Chew Tip, and the Textured Tongue Depressor Tip.
.

.
TONGUE ELEVATION [15:30]:
Let’s go to my fourth target—tongue elevation.
I will start with the Tongue Depressor Tip, the smooth one. Vibration is very important here because it gives even more stimulation to the tongue:
- So, I take the tongue [and use the Tongue Depressor Tip] to lift the tongue three times, upwards, and then hold it, upward. Be prepared here that the tongue wants very strongly to come out of the mouth if we have tongue thrust. So, you have to push, and you’re going to meet strong resistance from the tongue.
Then, I’m going to take the Button Tip—I told you I’m going to use the Button Tip a lot! I like it very, very much for tongue elevation:
- Because of the circle shape, it goes so nicely under the tongue, and you can push the tongue backwards again [for three repetitions and then hold for three seconds]. It’s not at all painful, and it’s really nice to hold the tongue upwards.
- I’m also using the Button Tip to work on the base of the tongue, the posterior muscles of the tongue which we must never forget. When the tongue is in front and in premature chewing and swallowing, it’s not only the tip of the tongue that we have to work, we also have to work on the base. The tongue has to learn to go backwards in the mouth—that’s why you have to work on the posterior muscles. I press the Button Tip on top of the tongue and push it backwards, and hold it there [for three to five seconds]. For this exercise, I prefer the Button Tip rather than the spatula (Tongue Depressor Tip) because I’ve seen that the spatula might produce some gagging. So, I prefer the Button Tip in this case; it doesn’t go as far inside the mouth. This is a very good exercise for speech therapy also. It’s also nice to do it with a smaller Button Tip, but I think the big one is very, very good.
Then, I’m going to use my Flat Spoon Tip — this is a new spoon in the ARK collection. There are two versions, and I'm using the textured one.
- I like to introduce the spoon because I use it later on to give [the child] some thick puréed food, so it’s nice to get them used to the spoon.
- I’m going to use it as a spatula to elevate the tongue and hold the tongue upwards.
- It’s also nice to use it for lateralization [pushing the tongue from side to side]—so it’s two in one; spatula and spoon! I think it’s a very good thing to have.
Finally, I’m going to use my Fine Tip. I love the Fine Tip for many exercises! This attachment is not for tongue elevation, because it’s pointy and can be painful under the tongue.
- It’s amazing if you want to pinpoint places for the tongue to go to work on tongue coordination.
- The main reason that I work with the Fine Tip is to educate the tongue on the correct place the tongue should push when we swallow. It’s right behind the teeth, it’s the palate alveolar (alveolar ridge), but we’re not going to say, "put your tongue on your palate alveolar." We’re just going to say, “Put your tongue on these bumps, or lines, behind your front teeth.” And then, [have the child] try to lick the Fine Tip.
- Trust me, if the tongue is weak, this vibration gives such good stimulation to the tongue to elevate and touch the spot that we want. If the tongue is weak, that’s okay, we’re going to work with the spatula and other Z-Vibe tips before getting this nice elevation.
- I also like to put here [on the Fine Tip] some chocolate syrup or some honey in order to make the licking more real.
So, for tongue elevation—I’ve used the spatula [Tongue Depressor Tip], the Fine Tip, the Button Tip, and the [Flat] Spoon Tip.
.

.
BITING AND CHEWING [21:30]:
At this moment, we’re also going to start working on some chewing. I always start with the Grabber, it’s the Soft [Standard] Textured one. I like that the child can also hold it, and I’m going to introduce biting on the molars.
I ask the child to hold it [and bite down], and I’m going to try to pull it out. You can have some fun games here, saying, “Oh, you’re so strong!” and they feel secure now that they can bite strongly! This is very good for their therapy.
And, always ask the parents to have their own Grabber at home to practice more, and have it somewhere whenever the child wants to take it [and chew on it].
The good thing about the ARK Therapeutic Z-Vibe tips is that there are so many you can use. This gives us the opportunity to work on the same target, doing the same exercise but with different tips. This makes our session more interesting and enjoyable—not only for us, but also for the child. I like to have at least three or four tips and tools from ARK’s collection, and ask the child which one they want to start with first. Then we get the child more involved in the therapy program.
At this moment, we cannot go more deeply into how I introduce solid food because we need another webinar on that, but I hope for now, this presentation was quite helpful and informative for you. Thank you very much, we’re going to go back to Hannah!
.

.
QUESTIONS [23:25]:
Hannah: Thank you for that wonderful presentation! We definitely had some questions come through, so we’ll go ahead and take some time for that. I think this question was from Miriam: Do you use all the Button Tips in one session? When do you know when to use the different Button Tip sizes?
Angeliki: I usually work with all the sizes. For example, when I work with the Y-Tip—let’s say I want to use it for chewing—I like to explain to them, “Okay, let’s start with the small one. It’s like biting a slice of cheese! Then, let’s go to the medium one. It’s like biting a biscuit [cookie]. Then, let’s bite the bigger one. It’s like biting a piece of meat.” Just to visualize for the future the food they will eat.
With the Button Tips, I’m doing the same. I start with the bigger one and move to the smaller ones just to practice because the smallest one is more difficult to hold. It’s to escalate the difficulty.
Hannah: Alright! We have a question from Sarah: Can all the probes [tips] and strategies be used across all age groups? How do you differentiate which age group to use with which tips?
Angeliki: It depends on the age of the child. If they are too small, you can’t start with the big Button Tip because it’s a tiny mouth! I mostly use the word “child” because I work with children in my clinic, but the same techniques can be applied for adults. The size depends on the age of the child and their anatomy. You have to see when you have the child in your clinic. Just watch the mouth especially!
Hannah: Darlene is asking: Is a once-a-week therapy session enough? So, how often should these techniques be used?
Angeliki: That’s a good question. For feeding therapy, we meet twice a week. If it’s tongue thrust only, this can be once per week—but for feeding therapy, it takes time to gain the trust. Not only from the child, but also from the parents. Give some extra time in your session to build a relationship with the parents. It’s not just a case of [the child] comes and goes. At the beginning, if there are sensory problems, the child is going to cry a little bit, it’s not going to be easy. So, as a therapist, you have to be sure and explain to the child and parents that you’re not going to cause any pain, it’s just irritating so don’t worry! It’s going to be a bit difficult at the beginning, but it’s getting better. It’s nice to, in advance, explain that to the parents.
Hannah: I think we still have some time! Julie is asking: Why do you prefer the Textured Grabber over the Smooth?
Angeliki: All the textured ones, I think are more stimulating. I start with the Textured one, with all those bumps, so the tongue can go on the bumps; it’s stimulating. That’s the whole difference.
Hannah: Okay! Let’s see here. I think we had someone asking, when you were using the Button Tips—were you pushing it on the back of the tongue, or on the surface? If you can go over the tongue retraction with the Button Tips.
Angeliki: Alright, if I want to work on the base of the tongue and have retraction, I put the Button Tip on [top of] the tongue and I push the tongue backwards. Under the tongue is when I do elevation.
.

.
Hannah: Okay, let’s see. Maybe we can get one more in. Any tips for upper lip muscle exercise? Theresa was asking when the child cannot close the lips on command.
Angeliki: So, you have to go back before introducing the Button Tip because it’s going to be difficult for that child. Work on the Preefer [lip closure exercise with the Preefer shown earlier]. The Brick Tips are also nice [to do the lip closure exercise]. You can do the same thing with different Z-Vibe tips. Also, the Bite-Chew [XL Textured] is also very nice. I would basically work more on this movement [pressing the lower lip up and the upper lip down].
You have to check other things also; any problem with allergies, diaphragm of the nose, open mouth posture, etc.—it’s just not loose lips. You have to check why the lips are so loose.
Hannah: I know a lot of people have been asking about tongue thrust and your development with that. I think we still have some time if you want to share a little about tongue thrust.
Angeliki: What I’ve seen is that we forget to work on the base of the tongue, so this is my first advice to therapists and parents. You have to find exercises that work on tongue retraction, because if we only work on the tip of the tongue, it’s only half the way. That’s why we have this push[ing out] of the food all the time. You can see that in Down syndrome, that it’s very difficult to have the tongue back inside the oral cavity, so you have to work a lot on retraction.
Hannah: Okay! Just a quick question: When would you recommend using vibration and not using vibration?
Angeliki: There are some children who are very hyperactive—they have hypersensitivity, or epilepsy, also be aware if they have this problem—in these cases, you have to be more aware of using the vibration. You can work without the vibration—same Z-Vibe tips, same tools, but don’t add the vibration. Or just a little bit. You have to take the [medical] history through evaluation and see if there would be a problem using a lot of vibration. That’s a good question!
I also wanted to add on another note: the way I am sitting with a child when doing feeding therapy—I don’t know how it is in your country [United States], but here in Greece we are allowed to hold the children more. So, I don’t work with them face-to-face. I have them on my lap, and we are working in front of a big mirror. It’s very important, even with the parents at home, to work with the child in front of a mirror, in their bathroom. I want the child to be in front of me and to see our faces. We’re doing the same movements, and it’s very important for the child to watch their face when we’re doing the therapy.
Hannah: That’s amazing! Thank you for sharing that! Before we wrap things up, do you have anything else that you wanted to add?
Angeliki: I’m very happy and honored to be invited, and I hope it was a nice presentation! Thank you very, very much!
Hannah: Thank you! We hope that everyone learned something new today, and we’re definitely looking forward to hosting more webinars in the future! Thank you, guys!
Angeliki: Bye from Athens!
.
Angeliki Xygka is a speech and language therapist, myofunctional therapist, and an ARK consultant. She graduated from City University London in 1996 and is a member of the Panhellenic Association of Logopedics. She is also an Orofacial Myofunctional therapist trained by the American Academy of Orofacial Myofunctional Therapy and an SI therapist.
She has been working for 25 years in Athens Greece, specializing in Apraxia, speech and language delay, stammering, and feeding therapy. She has also developed her own method of “tongue thrust therapy”.
She is married and the mother of five children.
Follow Angeliki on Instagram @angeliki.xygka or visit her website at www.logopedikos.gr.
.
