
DIY "Talk Back" Auditory Feedback Device
Posted by Debra C. Lowsky, MS, CCC-SLP on 30th Jun 2016
When working on articulation, I often find it best to begin the session with an auditory discrimination activity. Not only does this help children better hear their own speech, but it also helps them settle into therapy and focus their attention.
Auditory discrimination is the ability to tell the difference between correct and incorrect speech sounds. Some kids struggle with this, especially if there is ambient noise or other distractions around. A simple (and fun) way to help with this is through an auditory feedback device.
.
.
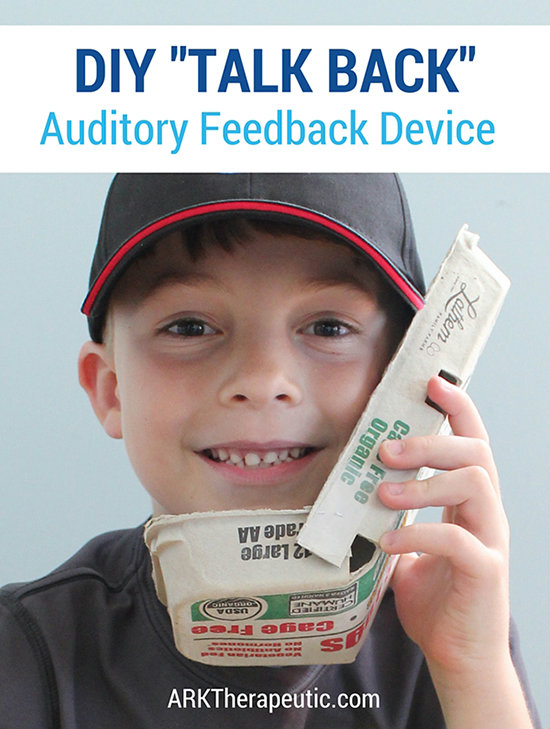
Did you ever try making one of those DIY “telephones” as a kid - the two cups connected via a string to talk to a friend from a distance? The concept of an auditory feedback device is the same, only instead of sending your voice to your friend, you’ll be sending it up to your own ear.
An easy way to make your own auditory feedback device, or “Talk Back” as I call them, is with an egg carton. I’ve been making these for years - they work pretty well, and can be made with materials you already have in your home / office.
.
.
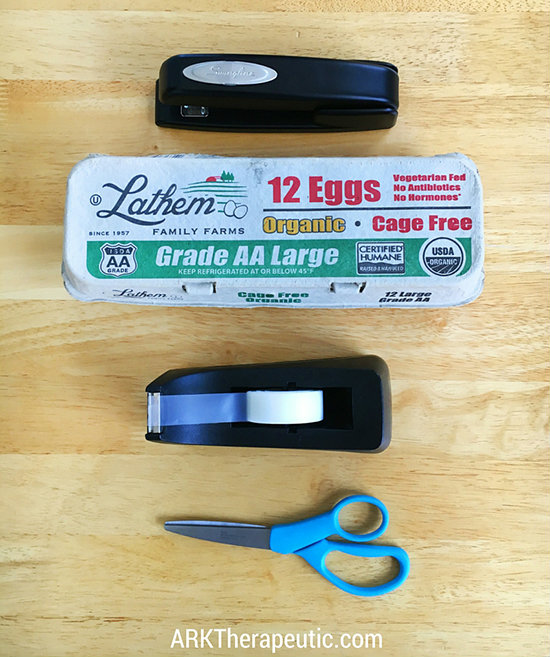
What you’ll need:
• Scissors
• Stapler
• Scotch/masking tape
• 1 egg carton (or more if you want to make more than one Talk Back)
.
Ideally cardboard egg cartons that hold a dozen eggs work best - they're easier for a child to hold, they transmit the sound better, and you can more easily watch the child's mouth because of the smaller size. But, I have made them before with 18-egg and/or styrofoam cartons if that's all I have. Either way, just be sure to select one without holes/cut outs in the lid (which would interrupt air flow).
Now on to the instructions. I usually have the child make their Talk Back with me, or at least watch me. This way they’re more invested in the activity, and it’s fun, and we can work on other skills at the same time such as following directions:
.
.
1. Show the child/children a Talk Back that you’ve made ahead of time. Demonstrate how it is used by putting it up to your left or right ear. Explain how the air is directed out of the mouth and channeled up to the ear, which makes it easier to hear yourself. Let them try it.
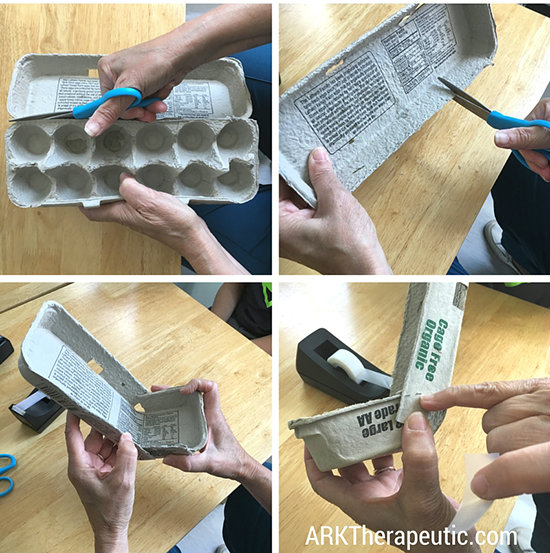
2. Take an egg carton and cut the top half (the lid) off. You don’t need the bottom half that holds the eggs.
3. Next, snip the bottom third on both sides.
4. Gently fold it up to make a “phone” shape and then staple the seams together so it retains the phone shape.
5. To be on the safe side, tape over the staples so there are no sharp edges.
.
That's it! You’ve now made your own Talk Back for instant auditory feedback. These are fragile and typically don’t transport well, so be sure to show the parents how to make one for home use, and/or send them this link. I encourage my speech kids to use their Talk Back as often as possible to practice their speech homework. I only see them once a week, so during all the time in between, the child can use the Talk Back to self-monitor and detect his/her own errors.
Talk Backs also work really well in group settings - you can give each child a Talk Back so that if you’re working with one child at a time, the others can still be practicing independently. They can also be used for voice therapy, dysfluency, regulating one's vocal intensity and speed, and even hearing oneself chew.
.
Have fun!
Debbie
Debra C. Lowsky, MS, CCC-SLP
.